
Segments
This article explaines the main purpose of Segments feature.
Segments are a powerful feature that allow businesses to divide their customer base into smaller, defined groups. This segmentation enables personalized communication and targeted content delivery, enhancing customer engagement and satisfaction.
What Are Segments?
- Definition: Segmentation involves dividing a broad customer base into distinct sub-audiences based on specific criteria.
- Purpose: The primary goal of segmentation is to tailor marketing efforts and content to meet the unique needs and preferences of different customer groups.
Key Features
-
Targeted Content Delivery
- Assign content (such as news, coupons, leaflets, etc.) to specific segments so only designated users can access and view them.
- Ensures that content is not shown to users for whom it is not relevant.
-
Customer Grouping for Personalization
- Group customers based on various factors.
- You can create your own segments or use our default dynamic segments (you can learn more about dynamic segments below)
-
Custom Segmentation for Special Offers
- Create exclusive offers for specific customer segments, such as VIP customers, new customers or employees.
- Employees can receive special discount coupons visible only to them if you place them into their very own segment.
- VIP customers can be offered premium promotions unavailable to general users.
- New customers can receive a welcome gift as a part of your promotional campaign.
-
Enhancing Marketing Strategies
- Segments allow for better targeting in marketing campaigns.
- Sending push notifications about new deals only to users you choose.
Tip: Create your own testing segment!
If you want to share something new with your customers and you're not sure how it will look in the app (e.g., a new coupon), you can test it on yourself first. Here's how:
- Create a new segment
- Add only yourself to it
- Assign the coupon to this segment.
This way, you'll be the only one who sees the coupon. You can then edit it as needed, and once you're satisfied, simply add more segments.
Types of Segments
If you are targeting a specific group of customers, you can choose either from predefined dynamic segments or create your own custom segment.
| Segment Name | Type | Description |
|---|---|---|
| Registered Members | Internal | All registered and verified members. |
| All visitors | Internal | All visitors: registered, unverified and anonymous members. |
| Without Coupons Activations | Dynamic | Without Coupons Activations |
| With Coupons Activations | Dynamic | All members with coupons activations. |
| Without Transaction | Dynamic | All members without transactions. |
| With Transaction | Dynamic | All members with transactions. |
| Registered in last 7 days | Dynamic | All registered members in the last 7 days. |
| Registered in last 30 days | Dynamic | All registered members in the last 30 days. |
| Your custom segments | Custom | Feel free to create your own segment according to your needs. |
Example Use Case
Scenario:
You want to create a promotional campaign to attract new customers and reward them with a special welcome gift for registering.
- Create a special welcome coupon.
- At the segmentation settings of your coupon choose the segment "Registered in last 7 days", save it and publish. More about creating coupons you can learn in the coupon article.
- Each customer who will register will automaticaly be awarded with the reward coupon and this coupon will be available in her/his account for 7 days since the registration.
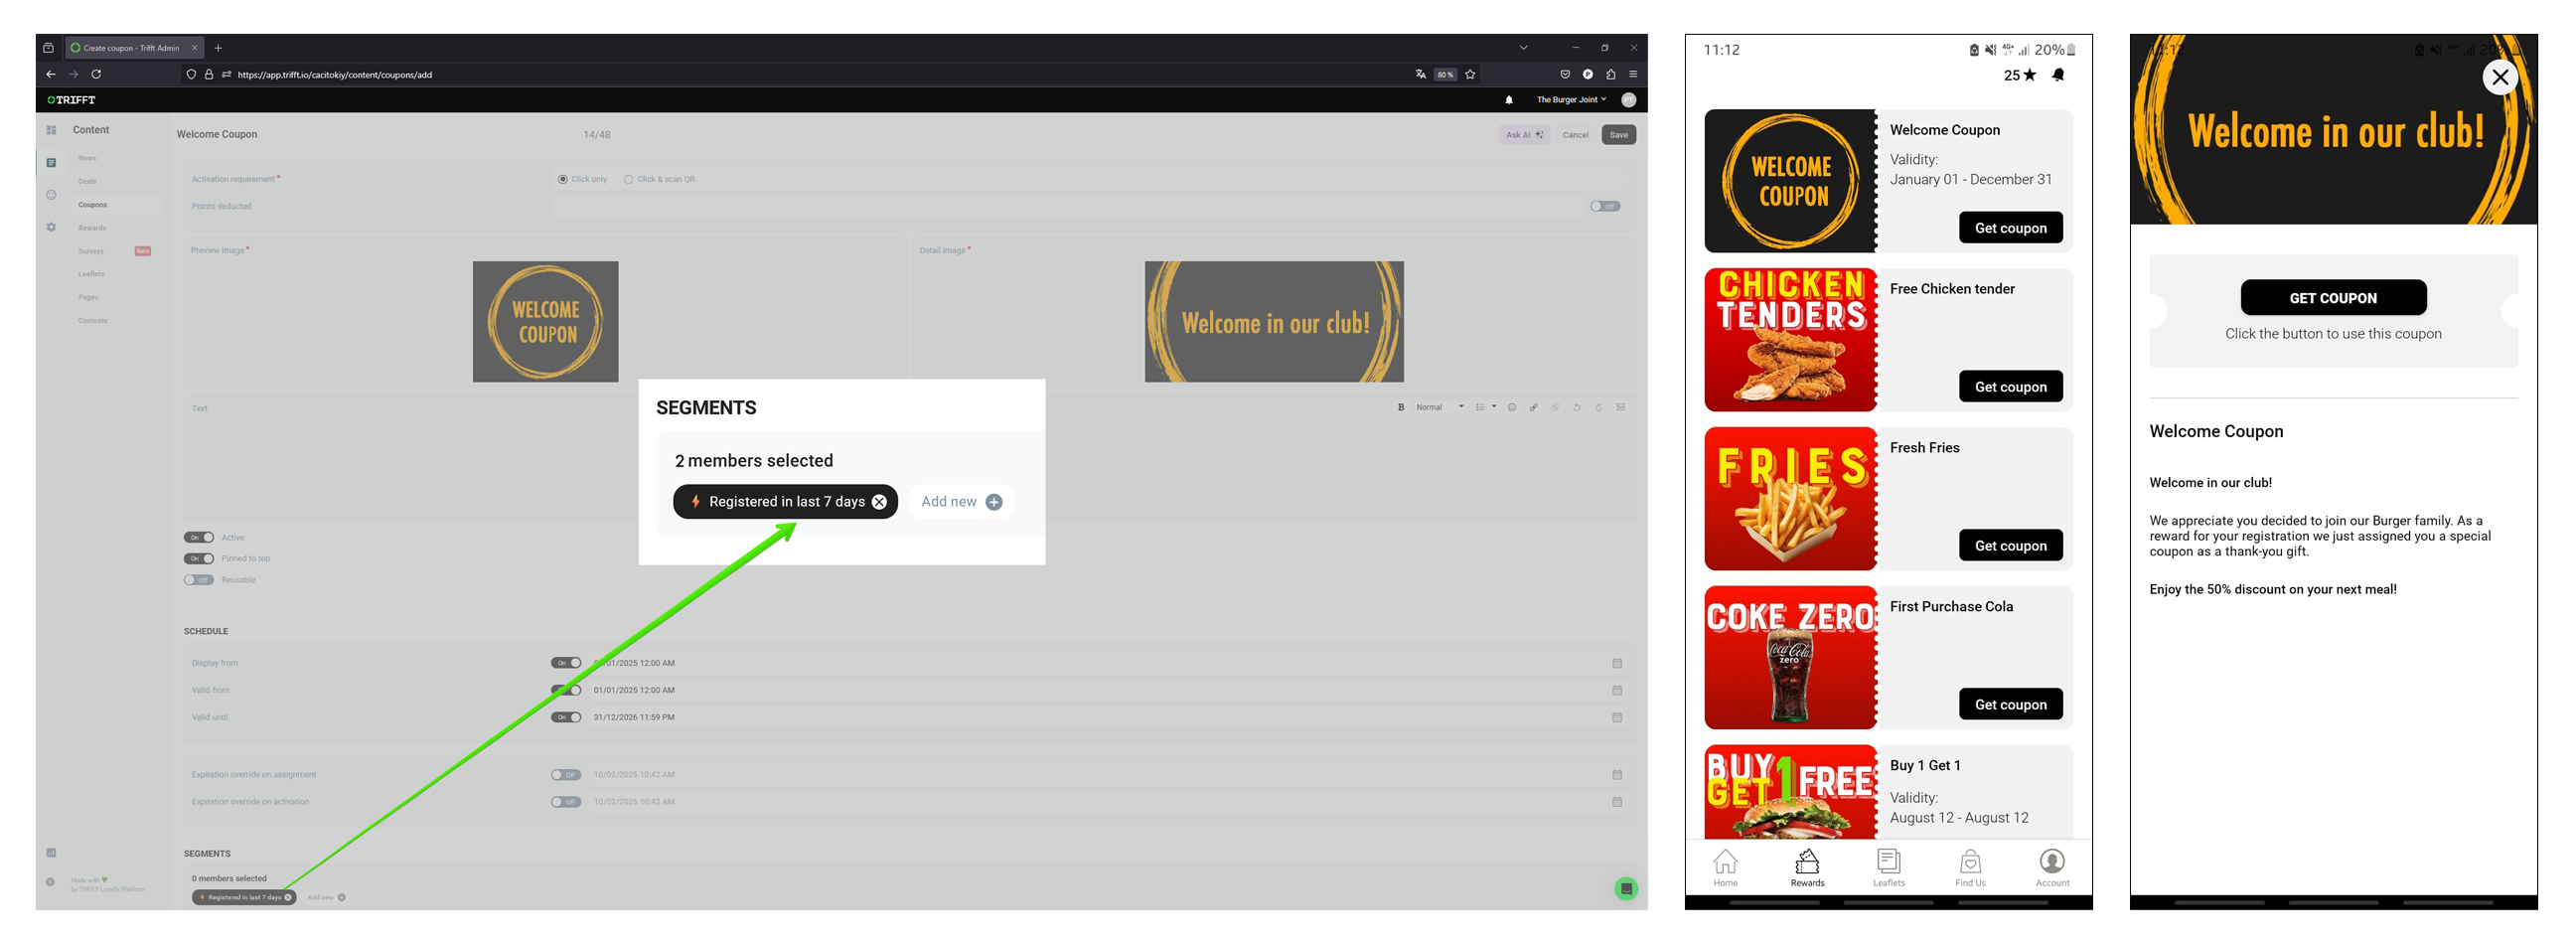
Coupon setup and in-app view
Updated 3 days ago